Mini Greenhouse Growing Guide

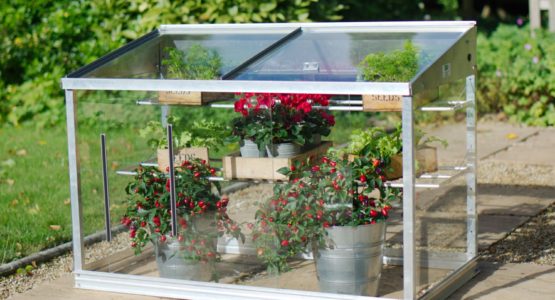
A mini greenhouse is a great addition to any garden, with the extra protection of growing under glass allowing a much wider variety of plants to be raised, and the growing season to be greatly extended. A mini greenhouse also gives so much more control over your garden, allowing you to over-winter your favourite plants, grow from seed and take cuttings; so in this guide to Mini greenhouse growing, we will consider a number of important aspects such as what you can grow, what to look for in a mini greenhouse and siting.
Mini greenhouse growing is a most satisfying and relaxing hobby, providing plenty of enjoyment without the full scale commitment of a large greenhouse. Access Garden Products make a wide range of mini greenhouses manufactured from architectural aluminium and glazed in toughened safety glass.
Mini greenhouse growing
In the first section of this Guide to Mini greenhouse growing, we look at what can be grown in a Mini greenhouse. With a little planning even the most compact of Mini greenhouses can be full of plants all year round. Access Mini greenhouses are designed to be very flexible, with adjustable / removable shelves and, on taller models, removable middle staging.
Spring
In the early Spring the mini greenhouse can be full of young plants, growing on ready for later transplanting into the garden. Many garden centres offer tiny plug plants at the very start of the season. These can be grown on inside the Mini greenhouse. Many plants, especially salad crops, can be grown direct from seed, in fact with a mini greenhouse you can look forward to fresh salads pretty much all through the year.
Summer
In the Summer, the Mini greenhouse can be used for protected crops such as tomatoes, peppers, cucumbers and aubergines. As other plants are planted out, the space left can be used for home grown Mediterranean crops.
Autumn
In Autumn time cuttings from fuchsias and geraniums can be taken to provide plant material for next year. Salad crops such as lettuce can be planted in the mini greenhouse to ensure a steady supply during the Winter months. Vegetables such as Spring cabbage can be grown on ready for planting out.
Winter
During the Winter months, the Mini greenhouse can be used to over-winter more delicate plants such as geraniums and fuchsias. Bulbs for Winter decoration can also be brought on in the mini greenhouse.
Things to look for when buying a mini greenhouse
In this part of our Guide to Mini greenhouse growing, we look features and costs. Mini greenhouses cost between £50 for a plastic framed, polythene skinned mini greenhouse to almost £1,000 for top of the range mini greenhouses, so the question has to be asked ‘Why pay more?’
Well, like anything, with Mini greenhouse growing you get what you pay for. Polythene covered models often need their covers replacing annually, which isn’t cheap, and won’t stand up to winds or snow – I hear lots of tales of people having to chase the mini greenhouse down the garden to try and rescue it – and of course if it blows away with all your plants in it, months of work will be ruined.
Size
Many people have very limited space available, so make sure you make the most of it. Avoid models where the doors open beyond the footprint of the mini greenhouse, as this will reduce the maximum width and depth you can fit in. Always purchase the biggest mini greenhouse you can fit in, the most regular complaint I get from customers is that they wished they had gone for a bigger model!
If your space available is very small, avoid walk-in mini greenhouses, as this space is dead space, reducing the growing area considerably.
Framework
Top of the range wooden mini greenhouses look beautiful and you can be pretty sure that they will have been manufactured from well seasoned hardwood that will last for years – cheaper wooden mini greenhouses, however, are prone to warping, and often have poor quality butt joints.
An aluminium mini greenhouse will never rust or corrode, especially if it is superior architectural aluminium, but care needs to be taken to ensure the manufacturer has not skimped on the thickness of the mini greenhouse sections. If looks are important, the aluminium can be ‘powder coated’ with an oven baked finish to give a long lasting decorative finish.
Reputable mini greenhouse manufacturers will guarantee the framework for many years, so look for a 15 or even 25 year guarantee.
Glazing
Glazing material is also an important consideration. Most budget mini greenhouses are clad in twin wall polycarbonate or very thin acrylic or polythene sheets. These can be made cheaply as they only require a lightweight frame to support them. However, high winds or snowfalls will cause the panels to pop out, ruining everything inside. Twin wall polycarbonate does provide some rigidity and insulation, but prevents you easily viewing your plants.
Glass is the traditional glazing method for mini greenhouses, and it provides excellent light transmission and a very long life. Glass will also stand up to high winds and snow loads much better than plastic. Many people are put off glass, as they are concerned about the safety aspects, however mini greenhouses glazed in toughened safety glass overcome these issues. Mini-greenhouses with 4mm safety glass use the same glass as the side windows of cars and in double-glazed windows. The toughening process makes the glass extremely strong and if it does shatter, it breaks into harmless pieces. Toughened safety glass, however, requires a very strong frame, so is only offered on the best quality mini greenhouses.


One thing many people overlook when purchasing a mini greenhouse is ventilation. Ensuring the plants do not get too hot in the Summer is as important as keeping them warm in Winter. Sliding door designs allow infinitely variable ventilation, from an inch or two in the early Spring to wide open in mid-Summer. Make sure there are plenty of ventilation panels, as you can never have too much ventilation! Models with automatic louvre vents or roof lights will ensure the mini greenhouse is adequately ventilated even if you are away from home.
Avoid models with front opening doors that have no securing cleats – these will just bang open and shut in the slightest breeze, and also avoid anything that only opens at the top, as this will provide insufficient ventilation on a hot day. Lift-up tops should also be avoided, unless they can be securely fixed, otherwise they will lift in high winds.
Flexibility
With a mini greenhouse, space is at a premium, so avoid models that either have no shelving, or have fixed shelves. Ideally you need lots of shelves in the Spring time, but these then need to be removed in the Summer for taller crops. Mini greenhouses with removable roof panels will allow tomatoes to grow out of the top.
Lean-to or free-standing
A mini greenhouse that is fixed against a wall has several advantages: as long as it has a sturdy framework it won’t blow away in even the mightiest gales; as it has no back it is less expensive than a free-standing mini greenhouse; and if it is fixed to a wall, the bricks or concrete act like a storage heater, absorbing the heat during the day and releasing it again at night. This reduces heating bills for the mini greenhouse and lengthens the growing time of the plants, particularly in the early Spring.
Free-standing mini greenhouses have the advantage that they can be sited anywhere, and can be moved around the garden if necessary. Unless you are placing it in a sheltered spot, ensure any mini greenhouse over 4’ (1.2m) tall includes ground fixings.
Siting the Mini greenhouse
In this section of the Guide to Mini greenhouse growing, we look at aspect. The first thing to be said is that many people worry unduly about aspect. The truth is, like all gardening, it is possible to adapt what you grow to the site you have.
East or West
Traditionally the favoured aspect for a mini greenhouse as it provides sun for some of the day, without being too hot. Allows the widest variety of greenhouse crops to be grown.
North
Ideal for bringing on young plants, especially late in the season when they would be scorched in the full sun. Unsuitable for sun loving crops such as peppers and tomatoes, although the plants can be grown on inside the mini greenhouse, then transferred to a sunny location later in the season.
South
Ideal in the early spring, as the mini greenhouse will benefit from plenty of sunshine, but good ventilation and shading will be a priority.


To make the most of your mini greenhouse growing, get a good book. One book I always recommend is ‘The Greenhouse Expert’ by D G Hessayon.
In addition, Access Garden Products produce a handy Growing Guide Chart which gives suggestions on varieties to grow, when to sow and planting tips.
Friends who garden are also an invaluable source of advice – gardeners tend to be very friendly and helpful by nature, so use their expertise, but don’t be put off by your own inexperience. One of the most enjoyable aspects of gardening is experimenting and finding out for yourself!


